Fixing Ribbon Breaks & Edge-to-Edge Alignment
Ribbon breaks can happen for different reasons depending on how the ribbon is breaking. A clean, straight break usually points to calibration or positioning. A melted or wrinkled break usually points to density or heat being too high.
If the ribbon breaks after a few cards and continues breaking after being taped back together, check the print position values before replacing ribbon or assuming a printer failure. A Y End Position value that is too positive can extend the printable area too far and cause the ribbon to tear.
Download Utility Position-Related Ribbon Break Melted Center Break Edge-to-Edge Positioning Clean Straight Break
Download the Configuration Utility
You’ll need the IDP Utilities package to apply these settings.
After downloading, unzip the archive and run CardPrinterConfig.exe. Click OK if prompted for a password, then review the configuration values shown in the utility.
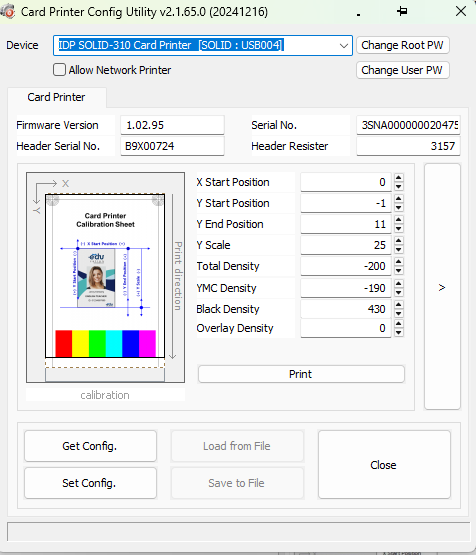
Position-Related Ribbon Break
If the ribbon snaps after printing several cards, check the position settings first. This is especially important if Y End Position is set to a high positive value. When Y End is extended too far, the printer may attempt to print beyond the normal printable area, which can overextend the ribbon and cause it to break.
As a first step, reset the main position values:
- X Start Position: 0
- Y Start Position: 0
- Y End Position: 0
Click Set Config. after making the changes. Power the printer off for 10 seconds, power it back on, and test several cards.
If the ribbon no longer breaks, the issue was likely caused by the print position extending too far. After confirming the ribbon break is resolved, only make small position adjustments as needed for edge alignment.
Melted or Wrinkled Center Break
If the ribbon break looks melted, wrinkled, or heat-damaged, the print density may be too high. Start by subtracting 50 from both Total Density and YMC Density, then click Set Config. and retry the print.
If the issue continues, subtract another 50 and test again.
Example: -250 minus 50 becomes -300.
Improving Edge-to-Edge Positioning
After the ribbon break is resolved, use small adjustments to correct white borders or off-center printing.
- To move the image left: subtract from X Start Position
- To move the image right: add to X Start Position
- To move the top edge up: subtract from Y Start Position
- To move the top edge down: add to Y Start Position
- To move the bottom edge up: subtract from Y End Position
- To move the bottom edge down: add to Y End Position
Make small changes, usually ±2 at a time. Always write down the original values before changing them. Click Set Config., power the printer off for 10 seconds, power it back on, and test again.
Do not make large Y End adjustments just to force edge-to-edge coverage. Extending Y End too far can cause ribbon movement beyond the intended print area and may result in ribbon breaks.
Clean Straight Break
A clean straight break, similar to a scissor cut, usually points to calibration or positioning rather than heat. If the card is blank or the image appears transferred onto the ribbon, start with position correction.
- Reset X Start Position, Y Start Position, and Y End Position to 0 first
- Click Set Config. and test several cards
- If alignment still needs correction, adjust one value at a time by ±2
- If the issue gets worse, return to the original value and adjust in the opposite direction
If the ribbon continues to break after resetting position values and lowering density, contact IDP Support with a photo of both sides of the ribbon break, the printer serial number, and a screenshot of the Card Printer Config Utility.
Comments
0 comments
Please sign in to leave a comment.